Pages

Friday, 9 May 2014

Stargazing with my parents

Whilst I have shown my parents the odd sight through my telescope from the back garden I was actually quite surprised when my father asked about me taking both my mother and him out to Harperrig Reservoir to see what we could see from a darker site. I was more than happy to oblige as it would mean I would have company if no one else was out there. It turned out that this was a pointless worry as a fair amount of people from the Central Scotland Observers Group forum were there.

Anyway because I was showing off things to my parents I actually scanned a fair amount of the sky but from a personal point of view I saw my first sights in Cancer and Gemini constellations which I have highlighted in the image below.


Messier 44 / Beehive Cluster
RA: 08 40.4 Dec: +19 59
Type: Open Star Cluster
Magnitude: 3.7

The Beehive Cluster is an open cluster in the constellation Cancer that I had seen through other telescopes  so it was nice to finally get a look at it through my own scope. The Beehive Cluster appears as a nebulous object to the naked eye and has been known since ancient times, in fact it was one of the first objects that Galileo looked at through his telescope.

The cluster is around 520-610 light years away and the title of Beehive Cluster is supposedly due to it supposedly appearing like a swarm of stars in a dance of activity. Personally it didn't really strike me as being much different that many other open clusters. Either way it was still a nice view in the lower power eyepiece although I think there was still a little bit to much magnification.

Messier 67 
RA: 08 51.4 Dec: +11 49
Type: Open Star Cluster
Magnitude: 6.1

Messier 67 is another open cluster in the constellation Cancer although this one is dimmer that the more famous Beehive Cluster. The interesting thing about this cluster is that it is actually the oldest one in the Messier list at between 3.2 and 5 billion years old. This could explain why it isn't the brightest of clusters as beyond the odd blue stragglers there are no bright blue stars left in the main sequence stage.

Overall, it was quite a nice cluster to see as there are a lot of stars present and it easily filled up my field of view and there are some nice reds and yellows present.

Messier 35 
RA: 06 09.1 Dec: +24 21
Type: Open Star Cluster
Magnitude: 5.3

The third open cluster of the night was Messier 35 which sits in the constellation Gemini and is around 2,800 lights years away. With several hundred stars present it is quite a nice sight to see although I suspect I could barely see more than sixty myself but even that was an enjoyable view. The interesting thing I noted about this cluster is that it didn't appear to have any core region where stars are condensed  together.

NGC 2392 / Eskimo Nebula 
RA: 07 28 10.8 Dec: +20 54 42.5
Type: Planetary Nebula
Magnitude: 10.1

It was great to finally look at something that wasn't an open cluster although with a magnitude of 10.1 I can't say NGC 2392 was the easiest object to see. The nebula which is named the Eskimo Nebula or Clownface Nebula supposedly resembles a person's head surrounded by a parka hood although to me it just looked like a tiny faint nebulous region more akin to a fuzzy star. I suspect on a darker night I may have tried to up the magnification to see if I could get a better look but I knew there was little point at the moment due to the spring night quite simply not being that dark at the time I was looking.

One additional object I want to highlight in addition to those I saw within Cancer and Gemini is the Whale Galaxy (Caldwell 32) which is an edge-on spiral galaxy within the constellation of Canes Venatici at RA 2 42 8.0 & DEC +32 32 29 and is is approximately 30 million light years away. I had previously tried to see this magnitude 9.8 Galaxy but hadn't managed to pick it up so I was pretty happy when I slewed to its location this night and was able to make out a very faint elongated shape that reminded me of the Cigar Galaxy (Messier 82). Of course I couldn't make out its tiny companion, NGC 4627 which is as dwarf elliptical galaxy with a magnitude of only 13.1

Besides the objects above that I have highlighted I also showed off a few of the usual targets such as the aforementioned Cigar Galaxy (Messier 82) along with Bode's Galaxy (Messier 81), Whirlpool Galaxy (Messier 51), Messier 3 Globular Cluster, Caldwell 21 Galaxy, Mars, Almach and Mizar. I have to be honest and say that most of the Deep Space Objects were a bit washed out as it just wasn't dark enough for my scope to capture them. However, due to the Cigar Galaxy and Bode's Galaxy being pretty much at the zenith they came out superbly. I even managed to get both of them in my field of view at the same time and was quite impressed.

Overall this was actually a successful night with me seeing a target in Canes Venatici I had failed to see in the past and seeing a few new deep space objects in both Cancer and Gemini. Very soon the astronomy season will be over due to the long summer days but I want to try and get out like this as much as possible for the time being.

Friday, 2 May 2014

Double Stars in Ursa Minor - Chapter 3

My continued adventure to try and observe double stars in Ursa Minor has entered its third chapter with another three stars observed and sketched. The double stars I am going to discuss tonight are STF 1583, STF 1928 & STF 1980 whose locations are shown below.


STF 1583 (HIP 58531 / SAO 1966)
RA : 12 00 10.43   Dec: +86 59 40.0
Magnitudes: 8.1, 9.3
Separation: 11.3”
Position Angle: 285°

Whilst looking for this star I discovered that the SAO number was not in the GOTO database which meant using the Right Ascension and Declination co-ordinates to find it.  As always, my pre study of the locale via Stellarium was very useful in helping me confirm I had the right target. Both components were pretty clear with a reasonable separation evident however whilst the primary stars A2 classification would imply a potential white blue colour it just looked like standard white to me. Then again I have to admit that unless stars are quite vivid in their colour I tend to struggle at seeing anything beyond white.


STF 1928 (SAO 8177)
RA : 15 09 17.20   Dec: +72 27 16.4
Magnitudes: 9.6, 10.2
Separation: 6.5”
Position Angle: 275°

Without doubt this was the most difficult target of the night, as with the previous star it didn't come up in the SAO catalogue on my GOTO mount and I had to use the Right Ascension and Declination co-ordinates. However, the reason I struggled was the close separation and low magnitude of the stars involved when I was looking at them in a Spring evening which wasn't that dark.

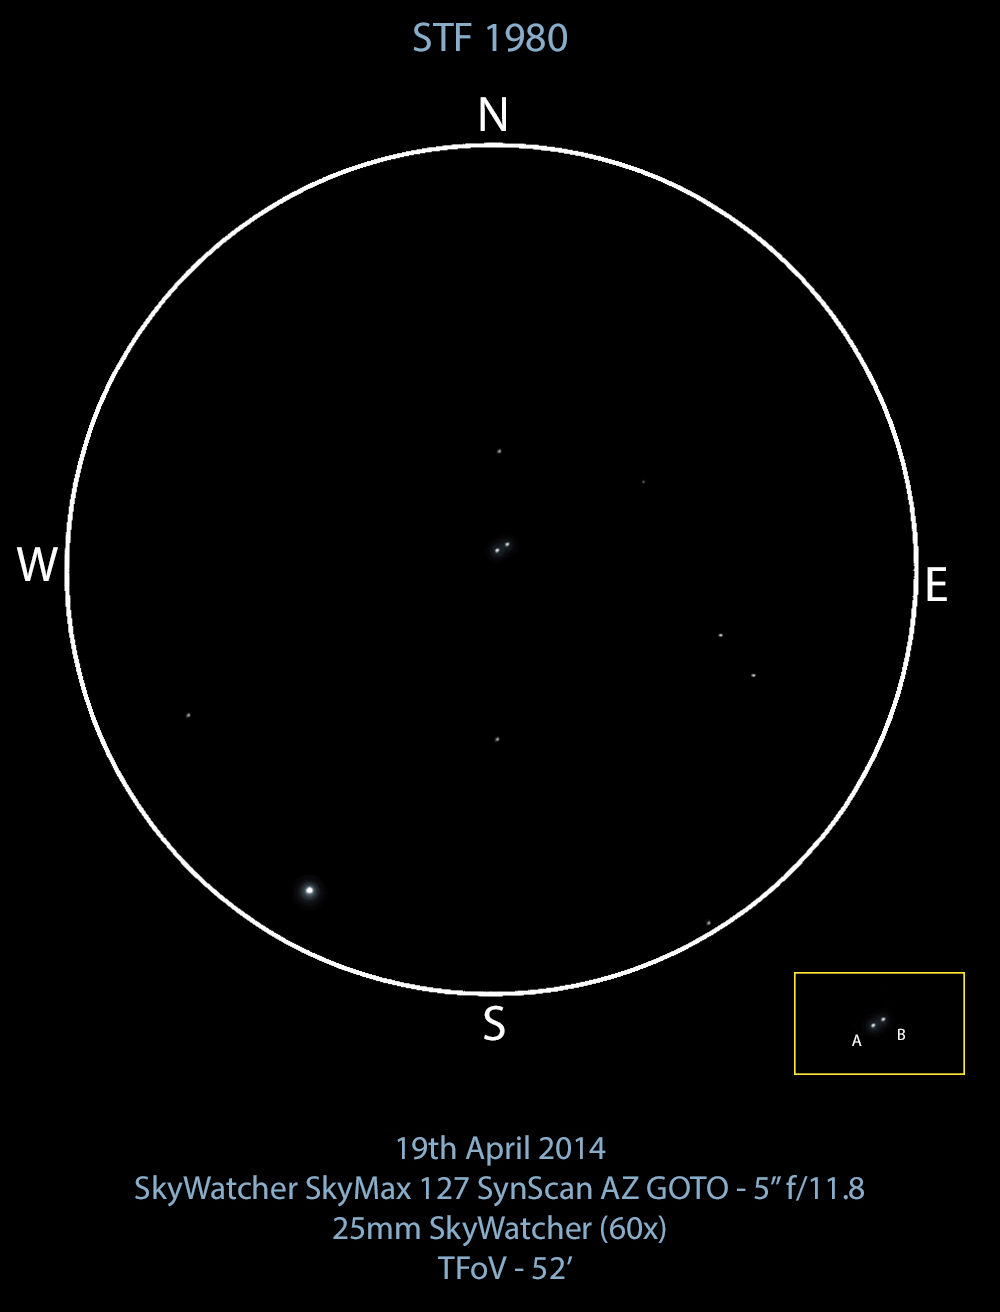
I was forced to employ averted vision to make out the lower magnitude companion and even then it was only a fleeting look.  The separation wasn't actually that bad and on a darker night I don't think I would have had any issue to be honest. Either way, the double star itself was fairly regular with both components appearing to be white. The real dominant star in the eyepiece was actually HIP 70942 which shines at a brighter magnitude of and 7.8 and can be seen in the sketch below at the 7 o'clock position.


STF 1980 (SAO 2568)
RA : 15 32 27.04   Dec: +81 03 10.4
Magnitudes: 9.2, 9.5
Separation: 10.1”
Position Angle: 49°

The third double star of the night and another no go with the SAO number, I may need to look up how many SAO numbers are actually present in the database as a fair few don't seem to be there when I look for them. The similar magnitudes of the stars involved with this double made it quite easy to make out and split in my 25mm eyepiece.  The primary appeared to be white which ties in with the F0 stellar classification, however I haven't been able to discover the stellar classification of the secondary component but to me it looked almost identical to the primary.


Overall, it was another successful double star hunt although the lighter skies are making it harder to make out the dimmer stars. Hopefully I will manage another night or two out looking at some more doubles before summer fully closes in and the telescope gets retired for a few months.

Thursday, 24 April 2014

Gemini & Cassiopeia

Sometimes at night I prefer just to look at the sky with my own eye rather than using binoculars or my telescope. I am enjoying trying to learn the various constellations and identifying them in the night sky. Of course, as I begin to identify them I also want to try and capture them with my camera.

And so recently I decided to try and capture Gemini and Cassiopeia which are currently both visible from my back garden. Gemini in particular is quite nice due to Juptier currently sitting within its boundaries so of course I am going to start with it.

Gemini is one of the constellations of the Zodiac and was described in the 2nd century AD by the astronomer Ptolemy. It's name is the Latin for "twins" and it is associated with the twins Castor and Pollux in Greek mythology. In fact the two brightest stars in the constellation are actually named Castor and Pollox. Gemini lies between Taurus to the west and Cancer to the east, with Auriga and Lynx to the north and Monoceros and Canis Minor to the south. In fact you can actually just make out Cancer and Canis Minor in my image below to the left of Gemini.


The other constellation I imaged was Cassiopeia which is named after the vain queen Cassiopeia in Greek mythology, who boasted about her unrivalled beauty. Cassiopeia was also one of the 48 constellations listed by the 2nd-century Greek astronomer Ptolemy. It is easily recognizable due to its distinctive 'W' shape, formed by five bright stars. It is bordered by Andromeda to the south, Perseus to the southeast, and Cepheus to the north. In the image below you should hopefully be able to see it in the central lower area just above the cloud cover.


Sunday, 20 April 2014

Space Stations & Iridium Flares

Planets, Stars and Deep Space Objects aren't the only thing you can see by looking up at night. You should easily be able to see the odd tiny spot of light moving quickly across the sky which is of course one of the many satellites which orbit the Earth. These satellites range from the rather huge International Space Station to space debris like discarded rocket boosters. An interesting tool to find out what satellites are passing overhead is Heavens Above, this is a website where you enter your location and it gives you the time a satellite will pass along with its actual path across the sky.

Amazingly enough one object I had never actually seen was the International Space Station even though it is quite bright in the night sky. Therefore I used Heavens Above to find it when it would be visible from my back garden and went out to have a look. Its magnitude was supposedly -2.5 and I have to admit it was very obvious moving across the night sky. I managed to get a 15 second exposure of its transit across the night sky which you can see below. It is quite an amazing site when you realise that what you are seeing is a man made space station with people on board.


Another interesting thing I noticed whilst on Heavens Above is that there is something called Iridium Flares which seem to happen quite consistently every night and actually get up to a magnitude of around -8.5 which is brighter than Venus. It turns out that a satellite flare is the phenomenon caused by the reflective surfaces on satellites (such as antennas or solar panels) reflecting sunlight directly onto the Earth below and appearing as a brief, bright "flare". The Iridium Communications Satellite has a peculiar shapes which results in these flares being quite bright to the point that they can potentially even been seen in daylight.

Anyway after reading about these I decided I had to try and both see and image one of these flares. Seeing them was quite easy and I even got my normally uninterested wife to say "Wow" when she saw one of the bright flares. Imaging them however was a bit of an adventure, my first attempt failed because my timing was off and I got an image of the satellite before and after the flare, the second time was ruined by cloud cover meaning that whilst I saw the flare I failed to aim the camera correctly, the third time the satellite failed to flare for some reason and the forth time was when I forgot part of my tripod meaning I couldn't set up the camera. It was fifth time lucky however and on Easter Saturday I sat outside and finally snapped a picture which you can see below.


This wasn't actually the brightest flare I saw but at least I managed to catch it. You can see the transit of the satellite brighten in the centre which is of course where it has flared.

Wednesday, 16 April 2014

Stars and Webcams

Webcams are a good cheap tool for looking at planets and the moon but recently I decided that I wanted to see if they could also be used on stars in the hope that I might be able to try and take the odd double star image in addition to sketching them. I decided to start with a nice bright single star to image first by picking Betelgeuse before moving onto a double star which was Almach. I have highlighted the locations of those two stars in the image below.

Betelgeuse + Almach

So as said above I decided to look at Betelgeuse which has a variable magnitude of 0.3 - 1.2 so is reasonably bright and easy to find. In addition it is a red giant so I was hoping I would pick up some nice colour.

Betelgeuse


As you can see above, I did pick up some nice orange colouring but it isn't the most exciting of images and I can see why people don't normally spend time just targeting individual stars.

I think double stars are different and Almach is a lovely double star with a nice yellow primary component and a tiny blue secondary component so I was hoping this would be a bit more interesting to see.

Almach


Yes, this was much more interesting to see and I love how you can see the blue colour of the secondary although I had to over expose the yellow on the primary to enable the webcam to pick up the dimmer companion. In the future it may be possible for me to take two images at different exposures and merge the images together to stop me over exposing the brighter components.

Overall, this has proved that I can at least image doubles in some manner and I may try and look at a few others in the future after I have at least done initial sketches.

Friday, 11 April 2014

Hello Mars!

So the last week of March and beginning of April this year have been terrible for astronomy. I had begun to forget what a star looked like but on the 6th April the clouds finally decided to part and for a few hours at least the sky was open to me. I decided therefore that now was the perfect time to try and image Mars as I was only a few days away from when it was due to look its best for the year.

Thanks to imaging Jupiter in the past I now know a little bit about the settings needed with Sharpcap and was recording videos within 5 minutes of setting everything up. This turned out to be quite handy as it was already about 10.45pm by the time I got around to getting the webcam out and I needed to be up early for work the next day.


I was actually quite happy with how much detail I managed to pick up with my first attempt and therefore decided to give the 2x Barlow a go to increase the magnification.


All I can say is that there was much more detail here than I had expected to pick up with my Xbox Webcam. The darker regions are there to see on both the barlowed and unbarlowed image. Quite simply I am pretty chuffed with this and hope I get a chance to go out again and image it some more. I might try and take a longer length video next time although I need to read up on how long I can image it before planetary rotation causes issues..

Monday, 7 April 2014

My first steps on the Lunar 100

Whilst discussing the moon on the Central Scotland Observers Group forum one of the members mentioned the Lunar 100 as a potential mission for people to undertake. For those of you who don’t know, the Lunar 100 is a list of the Moon's one hundred most interesting regions to observe as described in the April 2004 edition of Sky & Telescope magazine.

There is actually a handy check-list of the Lunar 100 on the Highlands Astronomical Society website along with a nice little diagram showing where on the moon they all are which you can get to via this link.

Anyway, the first three targets on the list are as follows:

L1 - Moon
L2 - Earthshine
L3 - Mare/highland dichotomy

These are all pretty easy for anyone to just go out and see with their naked eye but I thought I would try and grab a picture my compact camera through the 25mm Eyepiece on my telescope.

The Moon

It isn’t the best to be honest and I don’t think you can make out any Earthshine but I think we can all agree that it is the Moon and the light and dark contrast of the Mare and Highlands is clearly present.

After ticking off these three easy targets in the list I decided to work my way through a few other features on the list. The first of which was L10 - Mare Crisium ("Sea of Crises") which is a lunar mare that is 555 km (345 mi) in diameter. There are some lovely clear craters in this mare but my favourite is the crater Picard, the reason for this is simply because the name makes me think of Captain Picard from Star Trek.

My next target was L12 – Proclus which is a crater located to the west of Mare Crisium which has an asymmetric ray system whose features suggest an oblique impact at a low angle. If you look at the image below of L10 and L12 that I captured you can see the rays actually extending into Mare Crisium itself.

Mare Crisium & Proclus Crater


My final target of the night was L25 – Messier & Messier A which are two craters located in the Mare Fecunditatis (“Sea of Fertility"). These two crater are lined up with each other with two near linear rays extending westward for Messier A. It is actually theorised that Messier crater was formed by an impact at a very low angle, and that Messier A could have formed following a rebound by the impacting body

My attempt at capturing Messier and Messier A is shown below and is quite obvious due to its two linear rays.

Messier & Messier A Craters

I did attempt to use my 2x barlow to get a closer picture of these two craters but as usual with my barlow it wasn't very good. The more I try and use it the more I realise I probably need to change it sooner rather than later!

So overall I have enjoyed my introduction into the Lunar 100 and look forward to continuing my exploration of the lunar surface in the future. It at least means that I won’t have to groan in dismay as much when the moon is ruining the view of other objects in the sky.